3 Comments

7 Steps to Naturally Defined Brows

BROWS! Arguably one of the most important structural features on the face, eyebrows can make or break your whole look. They can also drive you insane trying to fill in and balance without looking fake or intense, especially if you have a fair complexion,  lighter hair color, or sparse brows. 

This tutorial is not for your painted, stylized brow. This is about achieving a natural, defined eyebrow look--the best way to frame your entire face without overpowering it. The great thing about this technique is that it's designed to build as you go...you can literally stop after any of the steps for a more simple brow.  Let's get started!  

First, let's talk product.  Shown below are my favorite brow products (which are coincidentally all MAC products), but let me go through what you want to look for in whatever products you use.

1. Brow gel: A mascara-like product that can be clear or tinted. This is used to brush through the brow hairs, and keep them in place, thicken the individual hairs, and, if tinted, add color to very light brows or warmth to very dark brows. DO NOT USE MASCARA. Mascara is way to dark, and way too thick.  If you're in a bind, you can use hair gel on a spooly, but be aware that some varieties of hair gel flake off the brows.

2. Brow filler: The actual pencil, creme, powder, or color used to actually fill in the brows. I prefer a very thin, wax based pencil, as it gives a high level of control, and very long wear. If you prefer creme or gel-based formulas for more drama, make sure to keep your brush very sharp throughout the entire process. Regular pencils like eyeliner tend to be thick and difficult to keep sharp and controlled. Powders will give you a less defined, blurred effect, and don't last as long, but can be more forgiving. Whatever you use, you'll need a shade lighter than your hair color and darker shade that matches your brow hairs: taupe and ash brown for blondes, gold and auburn for redheads, ash brown and chocolate for brunettes.  

3. Brushes: A spooly for brushing and a flat, dense brush for cleaning up.  Your spooly can be an actual spooly brush with a handle, a clean mascara wand, even a toothbrush! Anything with stiff bristles that will brush through your brow hairs without removing tons of product. Your clean up brush should be dense enough to give good payoff, and have a flat edge.  I prefer something with a tiny bit of fluff to make for easy blending.

4. Concealer: A medium to full coverage concealer with a long wear in a shade just slightly lighter than your skin tone. Liquid concealers are easier to blend, creamier formulas are thicker, and can melt in heat. If you use a stick concealer, or concealer pencil, use your clean up brush to create sharp edges that blend fully, instead of applying the stick directly.

Now, on to the technique!

Here's a quick rundown of the steps, and then I'll break each step down, and end with a time-lapsed video to help demonstrate.

IMG_7095.JPG


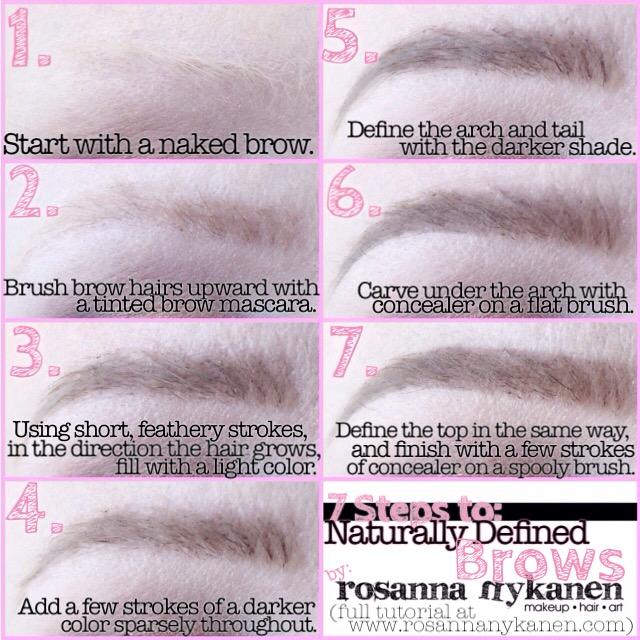
Step 1: Start with a naked brow.

A bit self explanatory, but important. If you do your brows after your other makeup, use a spooly to brush any excess foundation or powder out of the brows.


Step 2: Brush brow hairs upward with brow gel.

Especially important to use tinted brow gel for those with extremely light brows...this step will not only keep the brow hairs in place and nicely groomed, but will add color to the actual hairs so that you can see the natural brow shape. If you have literally zero brow hairs, this step can be skipped. If your brows are naturally full, you may find that this step alone is enough to define the brows to your liking. 


Step 3: Using short, feathery strokes, fill in the brow with the lighter shade of your brow filler.

The key is short, feathery strokes. There should be very light pressure...if you feel like you have to fight to get the color, your product may be dry or just the wrong formula for you. Make sure to make your strokes according to the natural growth direction of the actual brow hairs; When the hairs grow straight up, flick the stroke straight up. When they grow sideways, flick sideways.  When they grow downward, flick downward.  The goal is to create faux brow hairs.


Step 4: Add a few strokes of the darker shade throughout.

This is not the step to fill in the entire brow.  By filling in sparse strokes, you are adding dimension and keeping things natural. If it feels a little stripey, don't worry, we'll take care of that. Definition comes later, this is a key step to ensure a realistic brow effect.


Step 5: Define the arch and tail with the darker shade.

Again, make sure to use feathery strokes, in the direction of the hair growth. Start in the arch, and build the definition through the tail...the opacity you build will determine how intense the end look will be, so if you prefer a bit more power in your brow, don't be afraid to really fill in the arch and tail, just be aware of keeping the front of the brow feathery, and gradually building the intensity in the arch.


Step 6: Carve under the arch with concealer on a flat brush.

This is what really punches the definition in the brow. Tap your clean-up brush into a small amount of concealer, place the flat side of the brush flat against the skin, with the top edge of the brush just under the bottom of the arch. Using smooth strokes, carve along the bottom of the brow to create a clean edge. Then blend any hard lines away on the browbone.  If you start to close to the front of the brow, it can look very unnatural, and actually bring out the forehead ridge, which can have a masculine effect.


Step 7: Define top edge and finish.

The key here is using a very small amount of concealer...if the top edge is too defined, it ends up looking like the brows are floating off the face, but you still want to carve a bit by the tail.

BONUS FINISHING TIP: Dip a spooly in a bit of concealer and lightly brush through the finished brow. This blends everything together and creates a soft, cohesive look.


There you go!  Expertly defined, natural brows. Here's a quick video for reference:


Now, repeat on the other brow, and remember, eyebrows are sisters, not twins...they will never be exactly the same. Aim for balance, not perfection.

We made it! I hope this information helps you achieve all your eyebrow aspirations, and let me know if you have any questions.  And if you'd like a more individualized lesson, reach out for information on how to book a private lesson or party class with me!

Say hi in the comments, like if you're a fan, and share with all your friends, because friends don't let friends have bad eyebrows! 

3 Comments

1 Comment

Color Sensitivity

Color is amazing! I have always been awestruck by light and color and how our brains translate color. My connection to color on such a deep level is what drew me to makeup artistry. One of the most integral aspects of effective makeup artistry is color sensitivity: the ability to differentiate between colors and their relationships.  Matching foundation undertones, blending appropriate highlighting and contouring shades, and choosing just the right hues to "pop" your natural features are just a few of the important pieces of painting a face that would be near impossible without color sensitivity, not to mention being able to adjust those tones for various lighting, photography, or film needs!  

I stumbled across this Online Color Challenge, by X-Rite, a company that specializes in the technology and science of color, and also owns the popular color system Pantone. A series of color swatches with subtle variations ranging between two hues is presented out of order, and you rearrange the swatches so that the gradient between the two colors is correct. At the end, you are given a score between 0 (perfect color acuity) and 99 (low color acuity). I scored a 6.

Now, as someone who not only has spent the last decade making her living off of color acuity, and whose synesthetic brain literally connects color with emotion, I'm pretty happy with a 6...but I'm always curious about the perceptions people around me have of color. My husband is partially colorblind, and I'm constantly asking him to take quizzes like this...he scored a 78 on this one.   It used to make me sad that he doesn't see each individual color that makes up my vivid surroundings, as each individual color means something specific and beautiful to me.  I am learning more and more though that, while I am incredibly thankful for the gift of an expansive color spectrum, it is a beautiful thing to be able to experience a different color palette.

How do you see the world around you? Do you live in shades of grey, or a technicolored dreamscape, or some where in the middle? No matter how many hue variations you can physically see, take a moment to really look around and you may brighten your view.


1 Comment

1 Comment

Beauty

I watched this music video by Colbie Caillat, and was so moved by the images of Colbie removing her extensions, lashes, and makeup, and revealing the photoshop in real time.  I had to share my thoughts.

You don't have to try to be beautiful. You ARE beautiful. You are a human with quirks and pigments and scars and pores and layers upon layers of skin that cover muscle and fat and veins and bones that carry around the incredibly beautiful creation that is YOU. You are not your body. You are not your face. You are not your hair. All of those things make up pieces of you, but you are so much greater than the sum of those parts. 

You are beautiful. Period. Not in spite of these physical forms we inspect and dissect so intensely, but because of them. I don't mean to say that we should pretend everything about us is perfect (sometimes there are things we deem "ugly" about ourselves that are symptoms of something unhealthy to which we may need to pay attention). What I mean to say is that every piece of what we look like, or experience, or whatever, contributes to our context and viewpoint. All our various parts and pieces contribute to who we are, and they are also separate from who we are. 

Makeup and hair can be a perspective changer, an art form, an expression, a tool, a trick, a fantasy, a comfort, a language, a connection, a statement, a social convention, a show, a mask, a convenience....the list goes on. But it will never make you any more beautiful than you already are.  

As somebody who values being "pretty" a great deal, I will testify that I want to hear it all the time. I strive for other people to think I'm pretty. I love hearing how beautiful my eyes are, or how great my legs look, or whatever. And if I don't hear it consistently, I start to question wether I am, actually, beautiful. But when I really dig into the truth, I know I am beautiful. I am a valuable creation with a unique perspective in this world. I have a voice, and a purpose.  I have the power to choose my actions and how I interact with the world around me. I was made beautiful, and so were you. And when you know that you are wholly beautiful, without trying, without changing, you are not only empowered to face the ugly pieces without breaking, but you can clearly see all the beautiful people around you. 

And that truly is beautiful.

As a makeup artist, I hear people apologize for how they look every day, as though their untouched faces are offensive to me.  Let me shout it from the rooftops: YOU ARE BEAUTIFUL. Nothing I put on your face will change who you are. None of it matters if you don't know in your soul that you are enough without it. It is my job to tranform your face however you'd like, and I hope that in the process, perhaps you see how beautiful you are. My dream is that when you take off the lashes and the lipstick, you feel just as beautiful as when I put them on your face.

1 Comment

3 Comments

7 years later

image.jpg

7 years ago today, I had the pleasure of doing my dear friend's makeup for her wedding day.  

It's funny-doing bridal makeup is a completely different experience than any other makeup situation. Sure, the products can vary a bit, and brides tend to have more to say about their look than models, but there is something special about being a part of the "getting ready" for a wedding.  I take those moments seriously not only as a makeup artist, but as a human...there's a sweet electricity in the air around the bridal party as they prepare for the day.  

image.jpg

It feels almost like the girly silliness of any other event preparation; giggling over 8 curling irons sharing one outlet, choosing the silver stilettos over the black wedges, borrowing your best friends earrings in exchange for your bracelet.  But this event is different. Meaningful. At the end of the day, this woman will be married, and her nearest and dearest are not only getting ready to stand next to her during a ceremony, but celebrating everything they've gone through to get here.  The unspoken weight of closest friends supporting each other is evident. Even bridal parties I've never met almost immediately accept me into their inner circle of  trust and bonding. We are coming together to do whatever we can for our bride.  I am entrusted with translating this woman's heart onto her skin. As a makeup artist, it is an inexpilicable honor to be a part of that kind of sisterhood, even just for a few hours.

So you can understand the delight of sharing those moments with as dear a friend and sister as Bonnie (Volz) Kent. She was a confidante and mentor throughout my adolescence, and I consider her and her husband part of my family. As I reflect on that beautiful day seven years ago, it is my joy to wish Bonnie and Justin Kent a very happy anniversary!

image.jpg

3 Comments

3 Comments

Art!

What a crazy season of life!  I love this bustling time of holidays, parties, dinners, and projects, but I haven't taken the time to paint in far too long.  Back in August I painted two pieces to auction off at a fundraising benefit for I'm With Beka; they sent Beka Oakley to an Endometriosis specialist who changed her life and performed a surgery that took away the debilitating pain she was  living with every day for 10 years.  An amazing thing to be a part of, and even more incredible to see the change in Beka's life and those around her.  Needless to say, it was a great excuse to paint, so I thought I'd share the two paintings here to remind myself to find excuses to sit down and get creative!

"Be Brave" Acrylic on canvas.

"A Moment in Yellow" watercolor.

3 Comments

2 Comments

The other side of technical difficulties..

What started out as a last minute collaboration to take advantage of a random mutual day off turned into one of the coolest art inspired shoots I've had the pleasure of working on. 


I had a last minute shoot reschedule and ended up with a free Saturday and nothing to do, so I shot a text to photographer Brenna Gentry...  "Hey, are you up for a shoot? I'm hungry for creativity, so I'll spend Saturday painting,  but if you're up for it, I'd love to put a shoot together."  She suggested a watercolor inspired photoshoot! Brilliant!  So now we had 3 days to come up with a plan, background, and secure a model.  Literally 11pm on Friday night, I'm sitting on my dining room floor painting an old curtain panel, trying to keep my cats from tracking paw prints through it, and I get a text confirming a model for the next morning.  Maggie N. was absolutely perfect, and has possibly the most flawless skin on the face of the planet...a lovely canvas.

photo 1.JPG

Everything fell into place as I painted Maggie and "chalked" her hair with powders, we rigged up my backdrop in Brenna's backyard, and shot in the fleeting moments of sunshine we got throughout the nasty humid clouds of the day. 

photo 2 (1).JPG

Everyone left thrilled with the outcome and impatient for the final shots. Then a few weeks later, tragedy struck... Just as Brenna finished editing the last of the photos, the entire shoot disappeared from her computer AND backup!    After much time, stress, and money, she was finally able to recover smaller file versions of some of the original photos.  She painstakingly re-edited each one in their smaller format, and was able to mostly save our shoot!  They're smaller than we'd like, but at least they exist!

So after far too much effort, here's to the surviving representation of one of our favorite shoots!  :-)

2 Comments

Comment

My very first post.

Well, this is something I've never done before...  I'm not gonna lie, it feels petty cool to have a "dot com" after my name.  I am absolutely thrilled to have come to the place in my career where having a website is actually worth it, and honored to work with so many beautiful people.  I'm sure there will be lots of changes, and I will really try to keep this blog updated often with new and exciting projects.  Thanks for the support, and keep checking in! 

Comment